2014年4月22日 星期二

【File I / O 處理 09】位元組:BufferedOutputStream 類別


import java.io.*;
import java.util.Scanner;


public class FileIOBufferedOutputStream {

 public static void main(String[] args) {
  try {
   String fileName, fileDir;
   
   System.out.println("請輸入檔名: ");
   Scanner sn = new Scanner(System.in);
   fileDir = sn.next();
   
   BufferedOutputStream of = new BufferedOutputStream(new FileOutputStream(fileDir));
   String str = "Hello World!";
   byte[] b = str.getBytes();
   for(int i = 0; i < b.length; i++)
    of.write(b[i]);
   of.close();
  } catch(IOException e){
   System.out.println("輸入檔案路徑錯誤");
  }
 }

}
執行結果


新增檔案

【File I / O 處理 08】位元組:OutputStream 類別


import java.io.*;
import java.util.Scanner;


public class FileIOOutputStream {

 public static void main(String[] args) {
  String fileName, fileDir;
  try{
   System.out.println("請輸入檔名: ");
   Scanner sn = new Scanner(System.in);
   fileDir = sn.next();
   
   FileOutputStream of = new FileOutputStream(fileDir);
   String str = "Hello World!";
   byte[] b = str.getBytes();
   for(int i=0; i < b.length; i++)
    of.write(b[i]);
   of.close(); 
  }catch (IOException e){
   System.out.println("輸入檔案路徑錯誤");
  }
  
 }

}
執行結果


新增檔案

【File I / O 處理 07】位元組:FileInputStream 類別

輸入的來源是檔案。
import java.io.*;
import java.util.Scanner;


public class FileIOFileInputStream {

 public static void main(String[] args) {
  try{
   String fileName, fileDir;
   
   System.out.println("請輸入檔名: ");
   Scanner sn = new Scanner(System.in);
   fileDir = sn.next();

   FileInputStream fin = new FileInputStream(fileDir);
   int size = fin.available();
   byte[] b = new byte[size];
   fin.read(b);
   System.out.println(fileDir + " 位元大小: "+ size);
   for(int i=0; i < size;i++ ){
    //System.out.println(Byte.toString(b[i]));
    //System.out.format("%c", b[i]);
    System.out.print((char)b[i]);
   }
   System.out.println("OK");
   fin.close();
  }catch(IOException e){
   System.out.println("輸入檔案路徑錯誤");
  }
 }

}

執行結果


原本檔案內容

【File I / O 處理 06】BufferedWriter 類別


import java.io.*;
import java.util.Scanner;

public class FileIOBufferedWriter {

 public static void main(String[] args) {
  try {
   String fileName, fileDir;
   
   System.out.println("請輸入檔名: ");
   Scanner sn = new Scanner(System.in);
   fileDir = sn.next();
   
   BufferedWriter of = new BufferedWriter(new FileWriter (fileDir));
            of.write("以 BufferedWriter 寫入測試");
            of.newLine();
            of.write("讀取顯示這檔案");
            of.newLine();
            of.close();
            System.out.println("完成寫入檔案: "+ fileDir);
  }catch(IOException e){
   System.out.println("輸入檔案路徑錯誤");
   
  }
 }

}

執行結果


檢視輸出檔案


以此方式寫入,每次執行都會清除原來檔案的內容,若要在原檔案附加內容時,需要更改 FileWriter的參數:

      BufferedWriter of = new BufferedWriter(new FileWriter (fileDir, true));

【File I / O 處理 05-00】檔案寫入類別

Writer 類別處理字元資料流寫入指定檔案,其類別繼承圖示如下

【File I / O 處理 03】FileReader, BufferedReader 類別

import java.io.*; import java.util.Scanner;

public class FileIOBufferReader {

 public static void main(String[] args) {
  try {
   String fileName, fileDir;
   
   System.out.println("請輸入檔名: ");
   Scanner sn = new Scanner(System.in);
   fileDir = sn.next();
   
   FileReader file = new FileReader(fileDir);
   BufferedReader bf = new BufferedReader(file);
   do {
    String data = bf.readLine();
    if (data == null)
     break;
    System.out.println(data);
   } while (true);
   
   bf.close();
   
  } catch (IOException e){
   System.out.println("輸入檔案路徑錯誤");
  }
 }

}

執行結果

I/O : File 類別

 
import java.io.File;
import java.util.Scanner;

public class FileTest {
 public static void main(String[] args) {
  String filePath, fileName;
  
  System.out.print("檔案名稱 ? ");
  Scanner sn = new Scanner(System.in);
  filePath = sn.next();
  File fin = new File(filePath);
  fileName = fin.getName();
  
  if (fin.isFile())
   System.out.println("File exists : " + fileName);
  else if (fin.isDirectory())
   System.out.println("Directory exists : " + fileName);
  else {
   System.out.println("File or Directory Not Found");
   System.exit(0);
  }
 }
}

執行結果


測試有目錄存在時

【File I / O 處理 01】File 處理

File 類別並不是 I/O 中所定義在資料流處理的類別,但它可直接處理檔案 file 及檔案系統 (file system,即知道檔案在那個目錄 directory 之下)。
   方法                 功能
   _____________________________________________

 canRead             比較可否讀取檔案
   canWrite            比較可否寫入檔案
   compareTo           比較 2 個檔案路徑
   createNewFile       建新檔案
   createTempFile      建臨時檔案
   delete              刪除檔案路徑
   exists              判斷檔案存在否
   getName             取出檔案或路徑名稱
   isDirectory         判斷File物件是否為目錄
   length              檔案長度
   list                取出File名稱,以字串陣列表示
   renameTo            更改檔名
   setReadOnly         將檔案 / 目錄設定唯讀
   toString            取出檔案路徑字串
   toURL               將檔案路徑轉換成 URL 檔案
   _____________________________________________
   

檔案:FileIOIsFile.java
import java.io.File;
import java.util.Scanner;


public class FileIOIsFile {

 public static void main(String[] args) {
  String fileName, fileDir;
  
  System.out.println("請輸入檔名: ");
  Scanner sn = new Scanner(System.in);
  fileDir = sn.next();
  
  File file = new File(fileDir);
  if(file.isFile())
   System.out.println(file.getName()+" 是檔案");
  else if(file.isDirectory())
   System.out.println(file.getName()+" 是目錄");
  else {
   System.out.println("無此檔案或目錄");
   System.exit(0);
  }
 }

}
執行結果

輸入檔案名稱


輸入目錄名稱


【JDBC 01】下載 JDBC Driver,並連接 DB


import java.sql.*;

public class DBConn2 {

 public static void main(String[] args) {
  
  try {
   Class.forName("com.mysql.jdbc.Driver");
   System.out.println("Success loading JDBC-ODBC Bridge Driver");
  } catch (ClassNotFoundException e){
   System.out.println("JDBC 沒有驅動程式" + e.getMessage()); 
  }
  
  try { 
   
      String url =  "jdbc:mysql://localhost:3306/phone?" + 
                    "user=root&password=12345"; 
      Connection conn = DriverManager.getConnection(url); 
      if(!conn.isClosed()) 
          System.out.println("資料庫連線成功"); 

      conn.close(); 
  } 
  catch(SQLException e) { 
   System.out.println("資料庫連線失敗");
  }
 }

}


執行結果

【JDBC 00】安裝 XAMPP,JDBC Driver

1. 下載,並安裝 XAMPP: https://www.apachefriends.org/zh_tw/index.html
2. 下載 JDBC Driver,並加入 Project 的 Build Path 中 : https://dev.mysql.com/downloads/connector/j/
3. 設定 XAMPP 安全權限
 注意: 下列一定要設成 no,否則以 DriverManager.getConnection(url) 時,資料庫無法連接成功 

XAMPP:  MySQL is accessable via network. 
XAMPP: Normaly that's not recommended. Do you want me to turn it off? [yes] no


ElvisdeMacBook-Pro:~ root# whoami
root
ElvisdeMacBook-Pro:~ root# /Applications/XAMPP/xamppfiles/xampp security
XAMPP:  Quick security check...
XAMPP:  Your XAMPP pages are NOT secured by a password. 
XAMPP: Do you want to set a password? [yes] 
XAMPP: Password: 
XAMPP: Password (again): 
XAMPP:  Password protection active. Please use 'xampp' as user name!
XAMPP:  MySQL is accessable via network. 
XAMPP: Normaly that's not recommended. Do you want me to turn it off? [yes] no
XAMPP:  The MySQL/phpMyAdmin user pma has no password set!!! 
XAMPP: Do you want to set a password? [yes] 
XAMPP: Password: 
XAMPP: Password (again): 
XAMPP:  Setting new MySQL pma password.
XAMPP:  Setting phpMyAdmin's pma password to the new one.
XAMPP:  MySQL has no root passwort set!!! 
XAMPP: Do you want to set a password? [yes] 
XAMPP:  Write the password somewhere down to make sure you won't forget it!!! 
XAMPP: Password: 
XAMPP: Password (again): 
XAMPP:  Setting new MySQL root password.

【JDBC 00】建立資料庫

DB 操作:

查詢: show databases;
新增: create database Database_Name;
刪除: drop database Database_Name;
開啓: use Database_Name;

Table 操作:

新增: create table Table_Name ( ... );
查詢全部: show tables;
刪除: drop table Table_Name;

Schema :

查詢表格: show columns from Table_Name;

Data:

新增: insert into Table_Name(no,name) values (1,'Tom');


以 root 帳號登入
ElvisdeMacBook-Pro:bin elvismeng$ pwd
/Applications/XAMPP/bin
ElvisdeMacBook-Pro:bin elvismeng$ ./mysql -u root -p
Enter password: 
Welcome to the MySQL monitor.  Commands end with ; or \g.
Your MySQL connection id is 56
Server version: 5.6.16 Source distribution

Copyright (c) 2000, 2014, Oracle and/or its affiliates. All rights reserved.

Oracle is a registered trademark of Oracle Corporation and/or its
affiliates. Other names may be trademarks of their respective
owners.

mysql> 

新增資料庫
mysql> CREATE DATABASE phone;
Query OK, 1 row affected (0.01 sec)

mysql>

開啟資料庫
mysql> use phone;
Database changed
mysql> 

新增資料表 Table

mysql> CREATE TABLE student (
    -> ID integer,
    -> name char(30)
    -> );
Query OK, 0 rows affected (0.07 sec)

mysql>

查詢資料庫所有資料表 Table
mysql> show tables;
+-----------------+
| Tables_in_phone |
+-----------------+
| student         |
+-----------------+
1 row in set (0.00 sec)

mysql> 

查詢指定的資料表 Table
mysql> SHOW COLUMNS FROM student;
+-------+----------+------+-----+---------+-------+
| Field | Type     | Null | Key | Default | Extra |
+-------+----------+------+-----+---------+-------+
| ID    | int(11)  | YES  |     | NULL    |       |
| name  | char(30) | YES  |     | NULL    |       |
+-------+----------+------+-----+---------+-------+
2 rows in set (0.01 sec)

mysql> 

新增資料 Table
mysql> INSERT INTO student (ID, name) values (1,'Tom');
Query OK, 1 row affected (0.01 sec)

mysql> INSERT INTO student (ID, name) values (2,'Bob');
Query OK, 1 row affected (0.01 sec)

mysql> INSERT INTO student (ID, name) values (3,'Joe');
Query OK, 1 row affected (0.01 sec)

mysql> 

查詢輸入資料 Table
mysql> SELECT * FROM student;
+------+------+
| ID   | name |
+------+------+
|    1 | Tom  |
|    2 | Bob  |
|    3 | Joe  |
+------+------+
3 rows in set (0.01 sec)

mysql> 

Reference:
http://bonny.com.tw/web/xampp/0603newmysql.htm

【JDBC 03】異動資料:新㽪、修改、刪除


import java.sql.Connection;
import java.sql.DriverManager;
import java.sql.ResultSet;
import java.sql.ResultSetMetaData;
import java.sql.SQLException;

import javax.swing.JOptionPane;

import com.mysql.jdbc.Statement;


public class DBConn4 {

 public static void main(String[] args) {
  try {
   Class.forName("com.mysql.jdbc.Driver");
   System.out.println("Success loading JDBC-ODBC Bridge Driver");
  } catch (ClassNotFoundException e){
   System.out.println("JDBC 沒有驅動程式" + e.getMessage()); 
  }
  
  int op = 0;
  String sqlstr ="",id="",name="";
  try {
   op = Integer.parseInt(JOptionPane.showInputDialog("請選擇選單\n1: 新增 2:修改 3:刪除"));
   
   switch(op){
   case 1:
    id = JOptionPane.showInputDialog("請輸入座號");
    name = JOptionPane.showInputDialog("請輸姓名").replace("'", "'");
    sqlstr = "INSERT INTO student(ID,name) VALUES (" +
              id  + ",'"+ name + "'" + ")";
    break;
   case 2:
    id = JOptionPane.showInputDialog("請輸入欲修改資料(以座號為依據)");
    name = JOptionPane.showInputDialog("請輸姓名").replace("'", "'");
    sqlstr = "UPDATE student SET name='" + name +"'" +
             "WHERE ID = "+ id;
    break;
   case 3:
    id = JOptionPane.showInputDialog("請輸入欲刪除資料(以座號為依據)");
    sqlstr = "DELETE FROM student WHERE ID="+id;
    break;
   default:
    System.out.println("Error");
   }
  }catch(NumberFormatException e){
   
  }
  
  
  try { 
   
      String url =  "jdbc:mysql://localhost:3306/phone?" + 
                    "user=root&password=12345"; 
      Connection conn = DriverManager.getConnection(url); 
      if(!conn.isClosed()) 
          System.out.println("資料庫連線成功"); 
      
      Statement sm = (Statement) conn.createStatement();
      if(op !=0){
       sm.execute(sqlstr);
      }
      
      ResultSet rs = sm.executeQuery("SELECT * FROM student");
      ResultSetMetaData rsmd = rs.getMetaData();
      for(int i=1; i <= rsmd.getColumnCount(); i++){
       System.out.print(rsmd.getColumnName(i)+"\t");
      }
      System.out.println("\n---------------------");
      while(rs.next()){
       System.out.print(rs.getInt(1) + "\t" +
                           rs.getString(2));
       System.out.println();
      }
      
            sm.close();
      conn.close(); 
  } 
  catch(SQLException e) { 
   System.out.println("資料庫連線失敗");
  }
 }

}


執行結果
新增


修改


刪除


【JDBC 02】查詢資料

import java.sql.*;

import com.mysql.jdbc.Statement;

public class DBConn3 {

 public static void main(String[] args) {
  
  try {
   Class.forName("com.mysql.jdbc.Driver");
   System.out.println("Success loading JDBC-ODBC Bridge Driver");
  } catch (ClassNotFoundException e){
   System.out.println("JDBC 沒有驅動程式" + e.getMessage()); 
  }
  
  try { 
   
      String url =  "jdbc:mysql://localhost:3306/phone?" + 
                    "user=root&password=12345"; 
      Connection conn = DriverManager.getConnection(url); 
      if(!conn.isClosed()) 
          System.out.println("資料庫連線成功"); 
      
      Statement sm = (Statement) conn.createStatement();
      ResultSet rs = sm.executeQuery("SELECT * FROM student");
      ResultSetMetaData rsmd = rs.getMetaData();
      for(int i=1; i <= rsmd.getColumnCount(); i++){
       System.out.print(rsmd.getColumnName(i)+"\t");
      }
      System.out.println("\n---------------------");
      while(rs.next()){
       System.out.print(rs.getInt(1) + "\t" +
                           rs.getString(2));
       System.out.println();
      }
      
            sm.close();
      conn.close(); 
  } 
  catch(SQLException e) { 
   System.out.println("資料庫連線失敗");
  }
 }

}

執行結果

2014年4月21日 星期一

【File I / O 處理 02】Reader 類別

Reader 類別處理字元資料流讀取。

    方法                      功能
   _______________________________________________________

    close()                  關閉資料流
    mark(int numChars)       在資料流中標示目前的位置
    read()                   讀取 1 個字元
    read(char[] buffer)      將讀取的字元陣列放在buffer陣列中
    ready()                  檢查資料流是否準備好讀取
    reset()                  重置資料流
    skip(long n)             跳過 n 個字元
   _______________________________________________________


import java.io.FileNotFoundException;
import java.io.FileReader;
import java.io.IOException;
import java.util.Scanner;


public class FileIOFileReader {

 public static void main(String[] args) {
  try{
   String fileName, fileDir;
   
   System.out.println("請輸入檔名: ");
   Scanner sn = new Scanner(System.in);
   fileDir = sn.next();
  
   char[] buffer = new char[100];
   FileReader file = new FileReader(fileDir);
   file.read(buffer);
   System.out.println(buffer);
   file.close();
  } catch (IOException e) {
   // TODO Auto-generated catch block
   System.out.println("輸入檔案路徑錯誤");
  }
  
 }

}
執行結果

2014年4月17日 星期四

練習 8

續練習7. 設計一個活期存款教易帳戶 UI, 畫面上有 Label 元件 (銀行帳號 , 存入金額) 以及 TextField, 另外有一個確認按鈕 Button, 按下時顯示"交易完成" http://download.eclipse.org/windowbuilder/WB/release/R201309271200/4.2/

Generics : 多個泛型類型

class GenericNumbers <T1,T2>{
 private T1 number1;
 private T2 number2;
 
 public void setNumber1(T1 number){
  this.number1 = number;
 }
 
 public T1 getNumber1(){
  return number1;
 }
 
 public void setNumber2(T2 number){
  this.number2 = number;
 }
 
 public T2 getNumber2(){
  return number2;
 }
}
public class GenericsMultiDefined {

 public static void main(String[] args) {
  GenericNumbers <Integer, Double> number = new GenericNumbers<Integer, Double> ();
  number.setNumber1(10);
  number.setNumber2(20.5);
  Double d = number.getNumber1() + number.getNumber2();
  System.out.println("total : "+d);
 }

}
執行結果

Generics : 限制泛型可用類型

class GenericNumber2 <T extends Integer>{
 T number;
 public void setNumber(T number){
  this.number = number;
 }
 
 public T getNumber(){
  return number;
 }
}
public class GenericsList {

 public static void main(String[] args) {
  GenericNumber2 <integer> i = new GenericNumber2 <integer>();
  i.setNumber(10);
  System.out.println("Number value : "+i.getNumber());

 }

}
執行結果


若資料型態想改用Double定義,例如: GenericNumber2 < Double > d = new GenericNumber2 < Double > (); 那麼在編譯時,就會指出下列錯誤
Exception in thread "main" java.lang.Error: Unresolved compilation problems: 
 Bound mismatch: The type Double is not a valid substitute for the bounded parameter  of the type GenericNumber2
 Bound mismatch: The type Double is not a valid substitute for the bounded parameter  of the type GenericNumber2

 at GenericsList.main(GenericsList.java:18)
另,定義泛型類別
public class GenericClass <T> {
 ...
}
就如同以下列方式定義
public class GenericClass <T extends Object > {
 ...
}

Generics : 單個泛型類型

定義類別 class 時,當幾個類別的邏輯其實都相同,但只有涉及的資料型態不同時,則以泛型來定義類別(Generics Class)。

泛型類別本身就是資料形態,可用來宣告物件。

使用時要注意轉換型態或介面 type casting,否則在執行時 run time 會發生 ClassCastException。

class GenericNumber <T>{
 private T number;
 
 public void setNumber(T number){
  this.number = number;
 }
 
 public T getNumber(){
  return number;
 }
}

public class GenericsUndefined {

 public static void main(String[] args) {
  GenericNumber <Integer> i = new GenericNumber <Integer>();
  i.setNumber(10);
  System.out.println("Integer value : " + i.getNumber());
  
  GenericNumber <Boolean> f = new GenericNumber <Boolean> ();
  f.setNumber(true);
  System.out.println("Boolean value : " + f.getNumber());
  
  GenericNumber <Double> d = new GenericNumber <Double> ();
  d.setNumber(10.5);
  System.out.println("Double value : " + d.getNumber());
  
 }
}
執行結果


以泛型類別方法寫程式時,若不同型別做指定, 例如 d = i ; 時,編譯會出現如下錯誤
Exception in thread "main" java.lang.Error: Unresolved compilation problem: 
 Type mismatch: cannot convert from GenericNumber to GenericNumber

 at GenericsUndefined.main(GenericsUndefined.java:28)

Generics : 擴充泛型類別、實作泛型介面


class GenericNumber5 < T1,T2 >{
 private T1 number1;
 private T2 number2;
 
 public void setNumber1 (T1 number){
  this.number1 = number;
 }
 
 public T1 getNumber1 (){
  return number1;
 }
 
 public void setNumber2 (T2 number){
  this.number2 = number;
 }
 
 public T2 getNumber2 (){
  return number2;
 }
}

class SubGenericNumber5 < T1, T2, T3 > extends GenericNumber5 < T1, T2 > {
 private T3 number3;
 
 public void setNumber3 (T3 number){
  this.number3 = number;
 }
 
 public T3 getNumber3 (){
  return number3;
 }

}

public class GenericsCustomized {
 
 public static void main(String[] args) {
  SubGenericNumber5 < Integer, Long,Double> num = new SubGenericNumber5 <Integer, Long,Double&gr;();
  num.setNumber1(10);
  num.setNumber2( 200L );
  num.setNumber3(300.5);
  Double d = num.getNumber1() + num.getNumber2() + num.getNumber3();
  System.out.println("Total : "+d);
 
 }

}


執行結果
若要使用父類別時,父類別上宣告的型態持有者數目在繼承下來時,必須全寫。例如:SubGenericNumber 定義為 class SubGenericNumber5 extends GenericNumber5 ,則會發生編譯錯誤
Exception in thread "main" java.lang.Error: Unresolved compilation problems: 
 Incorrect number of arguments for type SubGenericNumber5; it cannot be parameterized with arguments 
 Incorrect number of arguments for type SubGenericNumber5; it cannot be parameterized with arguments 

 at GenericsCustomized.main(GenericsCustomized.java:38)
但,若子類別不用到父類別定義的資料、方法時,則可改寫如下。不過,建議將父親類別的型態持有者都保留。
class GenericNumber5 <T1,T2>{
 private T1 number1;
 private T2 number2;
 
 public void setNumber1 (T1 number){
  this.number1 = number;
 }
 
 public T1 getNumber1 (){
  return number1;
 }
 
 public void setNumber2 (T2 number){
  this.number2 = number;
 }
 
 public T2 getNumber2 (){
  return number2;
 }
}

class SubGenericNumber5 <T3> extends GenericNumber5 {
 private T3 number3;
 
 public void setNumber3 (T3 number){
  this.number3 = number;
 }
 
 public T3 getNumber3 (){
  return number3;
 }

}

public class GenericsCustomized {
 
 public static void main(String[] args) {

  SubGenericNumber5 <Double> num = new SubGenericNumber5 <Double>();
  num.setNumber3(300.5);
  Double d = num.getNumber3();
  System.out.println("Total : "+d);
  
 
 }

}
執行結果

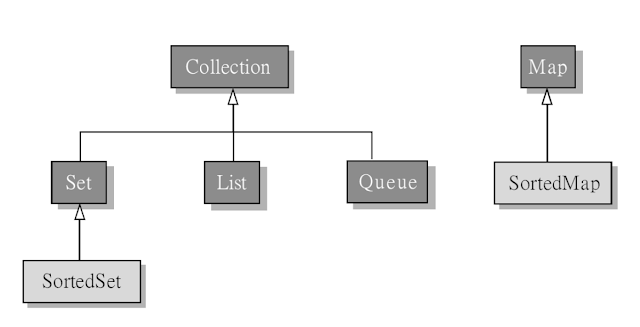
集合 Collection:概述

集合 Collection:與陣列Array有點類似,處理一群相關性的資料(或稱“元素”)。這些資料以Java 提供的工具箱 Collections 類別來處理,此工具箱包含 Hashtable、TreeSet、ArrayList、LinkedList、HashMap、TreeMap 等。


集合物件的特性

集合界面 具體實作類別 排序性 循序性 唯一性 鍵值對應
Set HashSet
SortedSet TreeSet
List ArrayList, LinkedList
Map HashMap
SortedMap TreeMap

參考


1. How are the collections structured? Which one should I choose?

集合 Collection:Set / HashSet

import java.util.HashSet;
import java.util.Set;


public class CollectionHasSet {

 public static void main(String[] args) {
  Set <String> hset = new HashSet< > ();
  hset.add("西瓜");
  
  String[] fruit = {"鳳梨","草莓","西瓜" };
  for(String p : fruit)
   hset.add(p);
  
  System.out.println(hset);
  
 }
}

執行結果


西瓜有加入嗎? 若改為 hset.add("葡萄"); 呢?
import java.util.HashSet;
import java.util.Set;


public class CollectionHasSet {

 public static void main(String[] args) {
  Set <String> hset = new HashSet< > ();
  hset.add("葡萄");
  
  String[] fruit = {"鳳梨","草莓","西瓜" };
  for(String p : fruit)
   hset.add(p);
  
  System.out.println(hset);
  
 }
}

執行結果

集合 Collection:SortedSet / TreeSet


import java.util.TreeSet;


public class CollectionTreeSet {

 public static void main(String[] args) {
  
  TreeSet < Integer > tset = new TreeSet < >();
  System.out.println("亂數取出 6 個號碼 (範圍 1 到 46)");
  for (int i =1;i <= 6; i++){
   while(true){
    int num = (int) (Math.random() * 46) + 1;
    if (tset.add(num)){
     System.out.println("第 "+ i + " 個號碼" + num);
     break;
    }
   }
  }
  System.out.println("物件"+ tset);
  System.out.println("物件第一個元素為 "+ tset.first());
  System.out.println("物件最後一個元素為 "+ tset.last());
  System.out.println("物件介於20 ~ 30 的元素為 "+ tset.subSet(20, 30));
 }

}
執行結果

集合 Collection:Map / HasMap


import java.util.HashMap;

public class CollectionHashMap {

 public static void main(String[] args) {
  HashMap <String, String> hmap = new HashMap<&gr;();
  hmap.put("1號","鳳梨");
  hmap.put("2號","草莓");
  hmap.put("3號","西瓜");
  System.out.println("水果籃子有: "+ hmap);
  
  if(hmap.containsKey("3號"))
   System.out.println("重複購買水果:(\"3號\",\"草莓\")");
  hmap.put("3號","草莓");
  System.out.println("水果籃子有: "+ hmap);
  
  System.out.println("增購水果:(\"4號\",\"西瓜\")");
  hmap.put("4號","西瓜");
  System.out.println("水果籃子有: "+ hmap);
  
  System.out.println("取消購買水果:(\"4號\",\"西瓜\")");
  hmap.remove("4號");
  System.out.println("水果籃子有: "+ hmap);
 }
}


執行結果

集合 Collection:SortedMap / TreeMap

import java.util.TreeMap;

public class CollectionSortedMap {

 public static void main(String[] args) {
  TreeMap <String, String> tmap = new TreeMap<>();
  tmap.put("5號","芒果");
  tmap.put("4號","西瓜");
  tmap.put("2號","草莓");
  tmap.put("3號","西瓜");
  tmap.put("1號","鳳梨");
  
  System.out.println("水果籃子有: "+ tmap);
  
  String key = tmap.get("3號");
  System.out.println("籃子裡第3號水果是 "+key);
  
 }

}

執行結果

集合 Collection:List / LinkedList


import java.util.ArrayList;
import java.util.LinkedList;


public class CollectionLinkedList {

 public static void main(String[] args) {
  ArrayList <Integer> aryList = new ArrayList<>();
  System.out.println("亂數取出 6 個號碼 (範圍 1 到 46)");
  for (int i =1;i <= 6; i++){
   while(true){
    int num = (int) (Math.random() * 46) + 1;
    if (aryList.add(num)){
     System.out.println("第 "+ i + " 個號碼" + num);
     break;
    }
   }
  }
  
  LinkedList <Integer> queue = new LinkedList <>(aryList);
  System.out.println("取出佇列 (以先進先出):");
  for(int j  = queue.size() - 1; j >= 0; j--){
   System.out.print(queue.getFirst() + " ");
   queue.removeFirst();
  }
  System.out.println();
  
  LinkedList <Integer> stack = new LinkedList <>(aryList);
  System.out.println("取出堆疊 (以後進先出):");
  while (true){
   System.out.print(stack.removeLast() + " ");
   if(stack.isEmpty())
    break;
  }
  System.out.println();
 }

}

執行結果

集合 Collection:Collections 集合類別

import java.util.ArrayList;
import java.util.Collections;

public class CollectionTest {

 public static void main(String[] args) {
  ArrayList <Integer> list = new ArrayList<> ();
  list.add(50);
  
  Integer[] fruit = {10,60,20,90 };
  for(Integer p : fruit)
   list.add(p);
  
  System.out.println("Number : "+ list);
  
  Collections.sort(list);
  System.out.println("Number(順排) : "+ list);
  
  Collections.reverse(list);
  System.out.println("Number(反排) : "+ list);
 }

}


執行結果

集合 Collection:Iterator 走訪器

Iterator 走訪器的走訪 visit 方式是單向的


import java.util.ArrayList;
import java.util.Iterator;

public class CollectionIterator {

 public static void main(String[] args) {
  ArrayList <Integer> list = new ArrayList<> ();
  list.add(50);
  
  Integer[] fruit = {10,60,20,90 };
  for(Integer p : fruit)
   list.add(p);
  
  System.out.println("Number : "+ list);
  
  Iterator<Integer> itera = list.iterator();
  while(itera.hasNext()){
   int num = itera.next();
   if (num >= 50)
    itera.remove();
  }
  
  System.out.println("Number : "+ list);
 }

}

執行結果

集合 Collection:ListIterator 走訪器

ListIterator 走訪器的走訪 visit 方式是雙向的


import java.util.ArrayList;
import java.util.ListIterator;

public class CollectionListIterator {

 public static void main(String[] args) {
  ArrayList <Integer> list = new ArrayList<> ();
  list.add(50);
  
  Integer[] fruit = {10,60,20,90 };
  for(Integer p : fruit)
   list.add(p);
  
  System.out.println("Number : "+ list);
  
  ListIterator<Integer> itera = list.listIterator();
  while(itera.hasNext()){
   itera.next();
   if (itera.nextIndex() == 2)
    itera.set(100);
  }
  
  System.out.println("Number : "+ list);
  
  System.out.print("Number : [");
  while(itera.hasPrevious())
   System.out.print(itera.previous() + " ");
  System.out.println(']');
 }

}

執行結果

2014年4月16日 星期三

Java Class 的名稱必須與其檔案名稱一致嗎?

Java Class 的名稱必須與其檔案名稱一致嗎?不需要!但,最好命名一致,方便日後管理。

例如:新增檔案 ATest.java,編寫程式如下:

class A{
   public static void main(String[] args){
      System.out.println("Hello,World");
   }
}

直行後,檢查發現執行的目錄下,除了 ATest.java 檔案外,還新增一個編譯過後的檔案 A.class
$ ls -l
total 16
-rw-r--r--  1 elvismeng  staff  404  4  3 11:05 A.class
-rw-r--r--  1 elvismeng  staff   93  4  3 11:05 ATest.java

多型:父子類別間之型別轉型

類別檔: Shape.java
public class Shape {
 public double x=5, y=10;
 public double r=10;
 public void draw() {
  System.out.println("圖形繪畫"); 
 }
}
類別檔: Rectangle.java
public class Rectangle extends Shape{
 public void draw() {
  System.out.println("矩形面積 :" + x * y);
 }
 
 public double area(double x, double y){
  return x * y;
 }
}
若測試時,父類別欲參考子類別新增加的資料或方法時,會有什麼情況發生?

類別檔: ShapeTest.java
public class ShapeTest {

 public static void main(String[] args) {
  Shape obj = new Rectangle();
  obj.draw();
  System.out.println("Area: " + obj.area(3.0, 8.0));
 }
}

此時編譯仍然會成功,但因 Shape 父類別沒有定義 area() 函數,這函數無法被 Shape 物件參照(reference),而會產生錯誤


父類別變數要參考到子類別新增加的資料或方法,需將父類別變數的資料形態,轉換成其子類別的資料形態。上面程式修改如下:
public class ShapeTest {

 public static void main(String[] args) {
  Shape obj = new Rectangle();
  obj.draw();
  System.out.println("Area: " + ((Rectangle) obj).area(3.0, 8.0));
 }
}


執行結果:

多型 :以 interface (介面) 為父類別實作多型

介面 Shape 之函數 draw() 只能有函數名稱,不能實作其函數內容。

類別檔: Shape.java
public interface Shape {
 public double x=5, y=10;
 public double r=10;
 public void draw(); 
}
類別檔: Circle.java
public class Circle implements Shape {
 public void draw() {
  System.out.println("圓面積 : " + r * r * Math.PI);
 }
}
類別檔: Rectangle.java
public class Rectangle implements Shape{
 public void draw() {
  System.out.println("矩形面積 :" + x * y);
 }
}
類別檔: ShapeTest.java
public class ShapeTest {
 public static void main(String[] args) {
  Shape obj = new Rectangle();
  obj.draw();
  
  obj = new Circle();
  obj.draw(); 
 }
}

執行結果 :

抽象類別與方法

定義:

僅宣告方法名稱,而不實作,此方法稱為「抽象方法」(abstract method)。 包含抽象方法的類別,稱為「抽象類別」。

限制:

1. 抽象類別與一般類別不同,抽象類別不能拿來直接產生物件
2. 抽象類別內部的沒有定義處理方法,因此繼承到子類別之後要加以明確定義,也就是加以改寫(overloading)
3. 不可對抽象類別方法指定為 final、static、private,因為子類別無法改寫


語法:

使用修飾詞 abstract 去定義抽象類別及抽象方法
   abstract class 類別名稱 {
      宣告 field;
      abstract 傳回值資料型態  method 名稱 (參數 ...)
   }


用法:

一般宣告抽象父類別的型態 Data Type 的變數,去參照其子類別的實體物件

Tips 小常識:

以 instanceof 運算子,偵測子物件所屬的類別

類別檔: Circle.java
public abstract class Circle {
 protected double r;

 public Circle(double r) { this.r = r; }
 public double getR() { return r; }
 public abstract void draw();
}
類別檔: SolidCircle.java
public class SolidCircle extends Circle {
        public SolidCircle(double r) { super(r); } 
 public void draw() {
  System.out.println("Radius of Solid Circle :" + getR());
 }
}
類別檔: DotCircle.java
public class DotCircle extends Circle {
 public DotCircle(double r){ super(r); }
 public void draw() {
  System.out.println("Radius of Dot Circle :" + getR());
 }
}
類別檔: CircleTest.java
public class CircleTest {
 public static void main(String[] args) {
  Circle p = new SolidCircle(5.0);
  if (p instanceof SolidCircle) {
   System.out.println("這物件是 SolidCircle 類別 ");
   p.draw();
  }
  
  p = new DotCircle(10.0);
  if (p instanceof DotCircle) {
   System.out.println("這物件是 DotCircle 類別 ");
   p.draw();
  }
 }
}
執行結果:

介面 interface

目的

在定義一組可操作的方法

限制

1. 實作某介面的類別,則必須實作該介面所定義的所有方法
2. 介面內部的 field 全部都是常數、全部的 method 都是抽象方法

語法

介面使用修飾詞 interface 去宣告介面類別。介面的成員(field 與方法 method)通常前面不會加上修飾子,但是這種情況下和在介面的 field 前面加上 public static final 、介面的 method 前面加上 abstract (抽象方法)具有相同的效果。
   修飾子 interface 介面名稱 {
      資料型態 field 名稱 = 運算式; // field 一定要初始化,常數宣告;
      傳回值的資料型態  method 名稱 ( ); //方法簽名
   }

介面使用修飾詞 implement 去實作介面類別。
   class 類別名稱 implements 介面名稱 {
      ...
   }


介面多重繼承

Java 並不支援多重繼承,但透過實作一個子類別能同時繼承自2個以上的父類別的方式,仍然可以達成多重繼承 method 名稱的目的。
   class 類別名稱 implements 介面名稱1, 介面名稱2, ... {
      ...
   }
要注意:繼承某抽象類別的類別必定是該抽象類別的一個子類別,但實作某介面的類別並不歸屬於那一類,一個物件上可以實作多個界面。

介面的延伸

介面與一般類別一樣,可以透過延伸 extends 的方式產生新的介面。原來的介面稱為父介面 superinterface,而衍生出來地稱為子介面 subinterface。
   interface 子介面名稱 extends 父介面名稱1, 父介面名稱2, ... {
      ...
   }
要注意:雖然父介面衍生出子介面時使用的是 extends,但要實作介面類別時,仍然要用 implements 這保留字。

範例

類別檔案:Vehicle.java
public interface Vehicle {
 void vShow();
}

類別檔案:Material.java
public interface Material {
 void mShow();
}

類別檔案:Car.java
public class Car implements Vehicle, Material {
 private int model;
 
 public Car(int model) { this.model = model; }
 
 public void vShow(){
  System.out.println("Car model is " + model);
 }
 
 public void mShow(){
  System.out.println("Car material is steel");
 }
}

類別檔案:InterfaceTest.java
public class InterfaceTest {
 public static void main(String[] args) {
  Car car1 = new Car(1);
  car1.vShow();
  car1.mShow();
 }
}

執行結果


套件 Package : 檔案的切割

Java 檔案未切割前

檔案:CarTest0.java
class Car {
   public void show() {
     System.out.println("Class Car");
   }
}

class CarTest0 {
   public static void main(String args[]){
     Car car = new Car();
     car.show();
   }
}
編譯程式 CarTest0.java
$ javac CarTest0.java
檢視目錄,發現編譯後新增 2 個類別檔案:Car.class 與 CarTest0.class
$ ls -l
total 48
-rw-r--r--  1 elvismeng  staff  389  4  3 11:56 Car.class
-rw-r--r--  1 elvismeng  staff  312  4  3 11:56 CarTest0.class
-rw-r--r--  1 elvismeng  staff  192  4  3 11:56 CarTest0.java
Java 檔案切割後

檔案:Car.java
class Car {
   public void show() {
     System.out.println("Class Car");
   }
}
在此,我們故意將類別名稱 CarTest 的命名與其儲存檔案的名稱 CarTest1.java 不相同。 檔案:CarTest1.java
class CarTest {
   public static void main(String args[]){
     Car car = new Car();
     car.show();
   }
}
編譯程式。
$ javac CarTest1.java
檢視目錄,發現目錄下編譯後新增加 2 個類別檔案:Car.class 與 CarTest.class。編譯後,原始程式儲存的檔案名稱 CarTest1.class 與其類別名稱不同,而編譯後會以類別名稱來產生一個新的類別檔案 CarTest.class。
$ ls -l
total 48
-rw-r--r--  1 elvismeng  staff  384  4  3 11:35 Car.class
-rw-r--r--  1 elvismeng  staff   81  4  3 11:35 Car.java
-rw-r--r--  1 elvismeng  staff  311  4  3 11:35 CarTest.class
-rw-r--r--  1 elvismeng  staff  109  4  3 11:33 CarTest1.java

執行結果。
$ java CarTest

Class Car


套件 Package: 用 package 管理 - 檔案切割後


Java 檔案切割後

隸屬在同一個 package 資料夾

檔案:Car.java
package test1;

class Car {
   public void show() {
     System.out.println("Class Car");
   }
}  
檔案:CarTest1.java
package test1;

class CarTest {
   public static void main(String args[]){
     Car car = new Car();
     car.show();
   }
} 
編譯程式。我們讓系統自動產生儲存這些 class 檔案所在的資料夾 test1
$ javac -d ./ Car.java CarTest1.java
檢視編譯結果:
$ ls -l test1
total 16
-rw-r--r--  1 elvismeng  staff  390  4  3 12:58 Car.class
-rw-r--r--  1 elvismeng  staff  323  4  3 12:58 CarTest.class   
執行程式
$ java test1.CarTest

Class Car


隸屬在不同的 package 資料夾

檔案:Car.java
package test2_1;

class Car {
   public void show() {
     System.out.println("Class Car");
   }
}  
檔案:CarTest1.java
package test2_2;

class CarTest {
   public static void main(String args[]){
     Car car = new Car();
     car.show();
   }
} 
編譯時,發生錯誤。為什麼?
ElvisdeMacBook-Pro:PackageManual elvismeng$ javac -d ./ Car.java CarTest1.java
CarTest1.java:5: error: cannot find symbol
     Car car = new Car();
     ^
  symbol:   class Car
  location: class CarTest
CarTest1.java:5: error: cannot find symbol
     Car car = new Car();
                   ^
  symbol:   class Car
  location: class CarTest
2 errors
這是因為兩個類別位於不同的 package,而無法存取對方,程式需改成

檔案:Car.java

package test2_1;

class Car {
   public void show() {
     System.out.println("Class Car");
   }
}


檔案:CarTest1.java

package test2_2;

class CarTest {
   public static void main(String args[]){
     test2_1.Car car = new test2_1.Car();
     car.show();
   }
}
編譯時,為何又有錯誤產生?
ElvisdeMacBook-Pro:PackageManual elvismeng$ javac -d ./ CarTest1.java
CarTest1.java:5: error: Car is not public in test2_1; cannot be accessed from outside package
     test2_1.Car car = new test2_1.Car();
            ^
CarTest1.java:5: error: Car is not public in test2_1; cannot be accessed from outside package
     test2_1.Car car = new test2_1.Car();
                                  ^
2 errors
錯誤原因在 Car 的存取權限要設為 public,所以程式需做下列修改

檔案:Car.java

package test2_1;

public class Car {
   public void show() {
     System.out.println("Class Car");
   }
}


檔案:CarTest1.java

package test2_2;

class CarTest {
   public static void main(String args[]){
     test2_1.Car car = new test2_1.Car();
     car.show();
   }
}
重新編譯
$ javac -d ./ Car.java
javac -d ./ CarTest1.java
編譯後會產生下列 package 資料夾與其相關類別檔案
$ ls -l test2_1
total 8
-rw-r--r--  1 elvismeng  staff  392  4  3 13:46 Car.class

$ ls -l test2_2
total 8
-rw-r--r--  1 elvismeng  staff  327  4  3 13:46 CarTest.class
執行結果
$ java test2_2.CarTest

Class Car

套件 Package: 用 package 管理 - 檔案未切割前

package 宣告語法
   package  package名稱 ;

Java 檔案未切割前

檔案:CarTest0.java
package test0;

class Car {
   public void show() {
     System.out.println("Class Car");
   }
}

class CarTest0 {
   public static void main(String args[]){
     Car car = new Car();
     car.show();
   }
}
編譯後,正常,同時新增 2 個類別檔案:Car.class 與 CarTest0.class
$ javac CarTest0.java

ls -l
total 48
-rw-r--r--  1 elvismeng  staff  395  4  3 12:13 Car.class
-rw-r--r--  1 elvismeng  staff  324  4  3 12:13 CarTest0.class
-rw-r--r--  1 elvismeng  staff  208  4  3 12:12 CarTest0.java
執行時,系統回饋錯誤訊息,為什麼?
$ java CarTest0
Exception in thread "main" java.lang.NoClassDefFoundError: CarTest0 (wrong name: test0/CarTest0)
 at java.lang.ClassLoader.defineClass1(Native Method)
 at java.lang.ClassLoader.defineClass(ClassLoader.java:800)
 at java.security.SecureClassLoader.defineClass(SecureClassLoader.java:142)
 at java.net.URLClassLoader.defineClass(URLClassLoader.java:449)
 at java.net.URLClassLoader.access$100(URLClassLoader.java:71)
 at java.net.URLClassLoader$1.run(URLClassLoader.java:361)
 at java.net.URLClassLoader$1.run(URLClassLoader.java:355)
 at java.security.AccessController.doPrivileged(Native Method)
 at java.net.URLClassLoader.findClass(URLClassLoader.java:354)
 at java.lang.ClassLoader.loadClass(ClassLoader.java:425)
 at sun.misc.Launcher$AppClassLoader.loadClass(Launcher.java:308)
 at java.lang.ClassLoader.loadClass(ClassLoader.java:358)
 at sun.launcher.LauncherHelper.checkAndLoadMain(LauncherHelper.java:482)
這是因為我們在 CarTest0.java 第一行新增 package test0; 即將這類別包裝在 test0 這套件中。套件 package 在實體上可被視為檔案夾,因此,我們手動新增一個資料夾,此資料夾必須與程式中的 package名稱一致,在這裏我們新增一個資料夾為 test0,然後將程式移入到此資料夾中。

編譯程式
$ javac test0/CarTest0.java
檢視編譯後結果
$ ls -l test0

total 24
-rw-r--r--  1 elvismeng  staff  395  4  3 12:21 Car.class
-rw-r--r--  1 elvismeng  staff  324  4  3 12:21 CarTest0.class
-rw-r--r--  1 elvismeng  staff  208  4  3 12:12 CarTest0.java
執行結果
$ java test0.CarTest0

Class Car

若不想手動新增資料夾,可用 javac -d 的指令由系統產生
$ javac -d ./ CarTest0.java
檢視編譯結果
$ ls -l test0

total 16
-rw-r--r--  1 elvismeng  staff  395  4  3 12:36 Car.class
-rw-r--r--  1 elvismeng  staff  324  4  3 12:36 CarTest0.class

套件 Package: 用 package 管理 - 匯入 import

檔案:Car.java
package test3_1;

public class Car {
   public void show() {
     System.out.println("Class Car");
   }
}
檔案:CarTest1.java
package test3_2;
import test3_1.Car;

class CarTest {
   public static void main(String args[]){
     Car car = new Car();
     car.show();
   }
}
編譯程式
$ javac -d ./ Car.java CarTest1.java
檢查編譯後結果
$ ls -l test3_1
total 8
-rw-r--r--  1 elvismeng  staff  392  4  3 14:07 Car.class

$ ls -l test3_2
total 8
-rw-r--r--  1 elvismeng  staff  327  4  3 14:07 CarTest.class
執行程式
$ java test3_2/CarTest

Class Car

建立 subpackage

我們可在 package 底下,再建立一個 subpackage,將性質、功能相近的類別彙集在同一個 package 當中,會變得更容易管理。

用這方法可建立出 package 與 package 的階層關係,但是要注意 package 與 subpackage 不必有絕對的裙帶關係,只要根據功能別加以適當分類就好。

檔案: Car.java
package test4_1.sub;

public class Car {
   public void show() {
     System.out.println("Class Car");
   }
}
檔案: CarTest1.java
package test4_2;
import test3_1.Car;

class CarTest {
   public static void main(String args[]){
     Car car = new Car();
     car.show();
   }
}
編譯程式
$ javac -d ./ Car.java CarTest1.java
檢視編譯後結果
$ ls -l test4_1/sub
total 8
-rw-r--r--  1 elvismeng  staff  396  4  3 14:18 Car.class

$ ls -l test4_2
total 8
-rw-r--r--  1 elvismeng  staff  327  4  3 14:18 CarTest.class
執行結果
$ java test4_2/CarTest

Class Car

匯入 import 多個類別

我們可一口氣以萬用字 * 匯入多個 package
import java.io.*

但記住:subpackage 與 package 有階層形式,但沒有實質上的裙帶關係,所以匯入時要特別設定
import java.awt.*;
import java.awt.image.*;
另外要提的是,程式若沒有匯入任何 package,事實上系統是用預設的 java.lang。

Swing 視窗:邊緣式版面配置 Border Layout

1.主要將視窗框切出東、西、南、北、中,這 5 個區塊

在視窗框的配置 contentPane.setLayout () 這方法中,其參數 LayoutManager 物件設為 BorderLayout。

2. public BorderLayout(int hgap, vgap)

例如:設定元件間的水平間距hgap是 30 像素,垂直間距vgap是 400 像素。

import java.awt.BorderLayout;

import javax.swing.JButton;
import javax.swing.JFrame;
import javax.swing.JPanel;


class Frame2 extends JFrame{
 private JPanel contentPane;
 
 Frame2(){
  setDefaultCloseOperation(JFrame.EXIT_ON_CLOSE);
  setBounds(200,200,450,300);
  setTitle("Swing JFrame 視窗");
  
  contentPane = new JPanel();
  contentPane.setLayout(new BorderLayout(0,0));
  setContentPane(contentPane);
  
  JButton btnNorth = new JButton("按鈕-北");
  contentPane.add(btnNorth, BorderLayout.NORTH);
  
  JButton btnWest = new JButton("按鈕-西");
  contentPane.add(btnWest, BorderLayout.WEST);
  
  JButton btnCenter = new JButton("按鈕-中");
  contentPane.add(btnCenter, BorderLayout.CENTER);
  
  JButton btnEast = new JButton("按鈕-東");
  contentPane.add(btnEast, BorderLayout.EAST);
  
  JButton btnSouth = new JButton("按鈕-南");
  contentPane.add(btnSouth, BorderLayout.SOUTH);
  
  
  setVisible(true);
 }
}

public class FrameBorder {

 public static void main(String[] args) {
  Frame2 frame = new Frame2();
 }

}

執行結果

Swing:元件:JLabel、JTextField

import javax.swing.JFrame;
import javax.swing.JLabel;
import javax.swing.JPanel;
import javax.swing.JTextField;

class Frame5 extends JFrame{
 private JPanel contentPane;
 private JTextField txtName;
 private JLabel lblName;
 Frame5(){
  setDefaultCloseOperation(JFrame.EXIT_ON_CLOSE);
  setBounds(200,200,450,300);
  setTitle("Swing JFrame 視窗");
  
  contentPane = new JPanel();
  contentPane.setLayout(null);
  setContentPane(contentPane);
  
  txtName = new JTextField();
  txtName.setBounds(180, 80, 100, 25);
  contentPane.add(txtName);
  
  lblName = new JLabel("姓名");
  lblName.setBounds(100, 85, 200,15);
  contentPane.add(lblName);
  
  setVisible(true);
 }
}


public class FrameText {

 public static void main(String[] args) {
  Frame5 frame = new Frame5();
 }

}
執行結果